How to Host Your Static Portfolio Website and Set Up the Pipeline for Free with AWS S3, Cloudfront and Gitlab
This guide will teach you how to host and set up the pipeline for your static portfolio website for essentially no cost at all. This is how I host this site as well. Infrastructure tech stack is the following:
- Gitlab
- AWS S3 for Static Web Hosting
- AWS Cloudfront for CDN (this will further reduce our cost)
- AWS ACM for SSL Certificate
Pre-requisites
- Your website. Stacks I have experience setting this up with is Angular and Vue. So yeah, other JS frameworks would work as well. Or really anything with build steps to create the static files.
- Gitlab Account (free account is sufficient)
- AWS Account (with payment method attached and we might expect a bill of hopefully 0 to sometimes 0.1 per month)
- Domain (this is the part that has cost. There’s no way getting around this unfortunately which is why the title only says the hosting and pipeline is free)
Steps
Let’s get started.
Prepare AWS resources
-
Create an SSL Certificate through AWS ACM. This allows our domain to be visted through the HTTPS/SSL protocol.
- Head to AWS Certificate Manager.
- Toggle Request a public certificate and then click Next.
- Enter to Fully Qualified Domain Name (FQDN). It is recommended to add both the www and non-www versions.
- Choose DNS Validation. This requires you to add CNAME records to the DNS manager of your domain name. If you’re not familiar with this concept, check out AWS’ guide on DNS Validation.
-
Create an S3 bucket with your desired domain name. This will be storage for our static files. For example, hannahcartojano.com. Make sure you are in the correct region. Also take note that bucket names should be unique within all AWS account in a certain region.
- Keep default options except the checkmark for Block all public access. We want this S3 bucket to be accessible by the public.
- Go to the properties page of the bucket once it has been created by AWS. Scroll down to Static web hosting and enable it. Keep default options. It might ask you to specify an index document. You can put index.html here unless your distribution files would have it otherwise.
- Add a bucket policy to allow it to be read publicly. Although we have disabled Block public access, an explicit policy still needs to be in place for AWS to allow it (this is just how AWS works). You can do this by going to the Permissions tab, and edit the Bucket policy section. Copy the following policy but remember to change the bucket name:
{
    "Version": "2012-10-17",
    "Statement": [
        {
            "Sid": "PublicReadGetObject",
            "Effect": "Allow",
            "Principal": "*",
            "Action": [
                "s3:GetObject"
            ],
            "Resource": [
                "arn:aws:s3:::Bucket-Name/*"
            ]
        }
    ]
}
-
Create a Cloudfront distribution. This allows our assets in the S3 bucket to be accessed through AWS’ edge locations. This results in faster load times and lower overhead as you are not making a request to S3 each time (which is also cheap) but to Cloudfront (which is much cheaper).
- In the first page of the creation wizard, choose the name of the bucket you created under Origin Domain.
- Scroll down to Settings (see Figure 1):
- Under Price Class, choose the edge locations that would most optimize your cost-to-performance ratio. For example, if you are expecting a vast majority of your visitors to be from Asia only, you can choose to toggle the option that includes Asia but not everything else.
- Under Alternate Domain Names, add your www and non-www domain.
- Under Custom SSL Certificate, choose the SSL certificate you created in Step 1 with AWS SCM. - Creation takes a few minutes. Take note of the Cloudfront distribution domain name after it is finished creating.

-
Create an AWS IAM user. This gives Gitlab permissions to push to our S3 bucket which is where the static files will be stored. Although it is not best practice to use long-lived credentials like this, for the purposes of this simplicity and since the permissions are just constrained and have a small impact, we’ll adopt this method for now.
- Create an IAM user and attach the following policy. Ensure you have changed the name of the bucket under the Resource list.
{
    "Version": "2012-10-17",
    "Statement": [
        {
            "Sid": "SpecificS3BucketPermission",
            "Effect": "Allow",
            "Action": [
                "s3:PutObject",
                "s3:GetObject",
                "s3:ListBucket",
                "s3:DeleteObject"
            ],
            "Resource": [
                "arn:aws:s3:::hannahcartojano.com",
                "arn:aws:s3:::hannahcartojano.com/*"
            ]
        }
    ]
}
Set up DNS Records
- If you’re using AWS Route 53 as your DNS manager (which I must warn costs 0.5 USD per hosted zone as of time of writing), you create an “A” record in the hosted zone of your domain. You toggle Alias to alias it to Cloudfront distribution and your list of options will conveniently display in a dropdown.
- If not, go to your DNS Manager for your domain and create an “CNAME” record. Point to root or whatever subdomain you will use (e.g. blog.example.com) to the Cloudfront distribution name in the previous step. For example, I might set hannahcartojano.com to point to https://d123456abcdef8.cloudfront.net using a CNAME record.
Set up Repository and Pipeline
-
Create a repository on Gitlab. Then, push the repository of your website to it. This should include all the source code as we will be executing the build steps on Gitlab’s free runners.
-
Create the necessary CI/CD variables.
- AWS_ACCESS_KEY : This refers to IAM user’s access key we created in the previous steps.
- AWS_SECRET_ACCESS_KEY: This refers to IAM user’s secret access key we created in the previous steps. This should start with an “AKIA” which means it is a non-expiring access key. Ensure that masking is enabled for this variable so it will not be visible in pipeline runs.
- AWS_DEFAULT_REGION: The region where you created the S3 bucket and other resources.
- S3_BUCKET_NAME: The name of the S3 bucket you created.
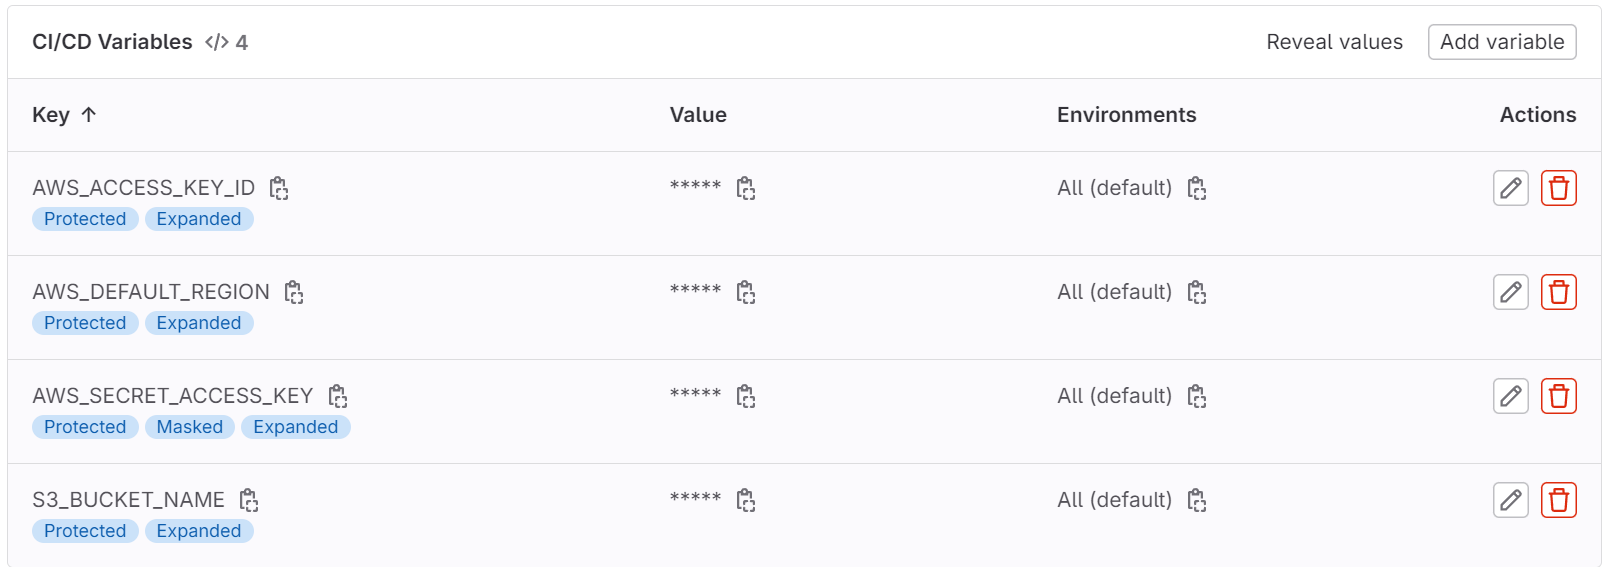
- It is best practice to set all the variables to Protected variables so that they will only be exposed to specific branches i.e. the ones that are protected.
- Create the pipeline script. This is done by creating a gitlab-ci.yml file and copying the examples below. You can use the pipeline editor that built in Gitlab. Depending on the tech stack you used, the pipeline scripts on the build stage will differ. See examples for different tech stacks below:
- Vue
image: node:latest

stages:
  - build
  - deploy

install_and_build:
  stage: build
  script:
    - npm install
    - npm run build
    - ls -la
    - cd dist && ls -la
  only:
      - production

deploy:
  stage: deploy
  image: registry.gitlab.com/gitlab-org/cloud-deploy/aws-base:latest
  environment: $CI_COMMIT_REF_NAME
  only:
      - production
  script:
    - echo "Deploying application..."
    - aws s3 sync ./dist s3://$S3_BUCKET_NAME/ --delete
    - echo "Application successfully deployed."
- Jekyll
image: ruby:3.2

stages:
  - build
  - deploy

install_and_build:
  stage: build
  script:
  - apt-get update -y
  - apt-get install -y nodejs
  - gem install bundler
  - bundle install
  - bundle exec jekyll build -d dist
  - cd dist && ls -la
  artifacts:
    paths:
      - dist
  only:
      - production

deploy:
  stage: deploy
  image: registry.gitlab.com/gitlab-org/cloud-deploy/aws-base:latest
  environment: $CI_COMMIT_REF_NAME
  only:
      - production
  script:
    - echo "Deploying application..."
    - aws s3 sync ./dist s3://$S3_BUCKET_NAME/ --delete
    - echo "Application successfully deployed."
    - aws cloudfront create-invalidation --distribution-id $DISTRIBUTION_ID --paths $INVALIDATION_PATHS
    - echo "Cloudfront cache successfully cleared."
General steps:
- Build stage - builds the distribution files in a specified directory through build steps specific to the stack. The docker image that is used must also be what is required by the stack.
- Deployment stage - An AWS docker image is used where the credentials can be pulled from the Gitlab CI/CD variables which we also have set up earlier. It copies the distribution directory to the root of an S3 bucket. In some cases, we might want a full cache invalidation of Cloudfront to immediately see our changes.
- Take note of the use of only: production in both stages. This limits the running of the pipeline scripts to a specific branch which is why in the next steps…
-
Create a production branch. Use the master or main branch as the source branch. This will trigger the pipeline run. This will fail if you have set up the Gitlab CI/CD variables to only be exposed to protected branches.
-
Protect the production branch. This setting will be found in the Repository section of Gitlab settings. If the pipeline is ran again, it should run successfully.
And that’s it!
Every push or merge request to your production branch will trigger a deployment to your website.
If you encounter any issues and need some good ol’ guidance, feel free to comment below or send me an email if I haven’t set that up yet.
Want More?
Here are some more blog posts you might like to read next: